
How to Use Nespresso Frother? Nespresso Frother Instructions

Everyone has a familiarity with the name Nespresso. It adds up to the taste and quality of the coffee. Whether you need the espresso machine or a milk frother, Nespresso is all available to help you in your hour of need. It maintains the milk quality and provides you with highly efficient taste and output.
You spend money on the Nespresso machine and gain several advantages. Most of us are unfamiliar with the proper use and application of this Nespresso frother. Indeed, they inquire about; How to Use Nespresso Frother?
The use is not problematic. Everyone with a bit of operating knowledge can use it efficiently. This is the central point of writing this content for you. We will depict the significant point of concern related to the Nespresso milk frother, its use, and its working.
So, you can make your personal experience better by using the Nespresso frother. To find out further details, explore the facts provided next;
Nespresso frother
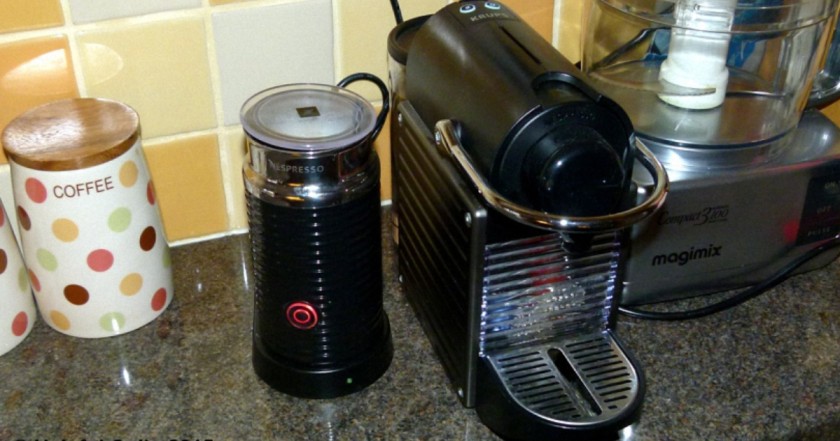
There is a great variety available for the Nespresso frother. These frothers are meant on the same principle. They work for better milk activity so that the audience can have a reliable taste.
If you are thinking of putting up your money on any of the milk frothers, here is the most apparent option: Nespresso. Out of all the range of espresso, it is up to you to choose the most reliable one.
However, the choice only can not provide you with all activities. It requires complete information about; How to Use Nespresso Frother? This proper working mechanism will help you to get the high quality and best taste of the milk. Even the children who ran from the milk and did not like it will love to have it for your experience.
The working of my brother’s work is not that tough. It simply requires the primary material for the process. The rest of the thing is to follow up on the instructions. If you follow all the instructions step-by-step, you will have a high-class performance.
To provide you with the usability details, here we are providing you with a complete guide!
Nespresso Milk Frother Instructions: Step-by-Step
As Nespresso is an electrical gadget, it requires electric power to build the system. You do not have to spend too much time on Nespresso, as it provides a quick working activity.
Before initiating the process, ensure that you have an appropriate and high-quality nespresso machine. In addition, you should place it near the electrical cord so that it can easily be attached to the electrical socket.
In addition to this, it performs most of the operational activities on its own. Thus it is considered to be the best alternative to the manual options. It contains a simple three processes for your help; the steps are provided below.
Step1 – First, you have to put the milk in the frother. You can use any choice, even ordinary and flavored milk. At the same time, these flavored and nondairy options of a mil are not that suitable for giving you a foaming result.
For this step, the experts recommend Full-fat milk because it provides enough foam to you over the milk. However, those conscious of the gain of calories might go for the pic of low-fat milk.
After the choice of milk, add up into the frother material. Fill it thoroughly until it reaches the canister.
The canister, on average, has the capacity of around two lattes to three. After that, adjust the lid and place the canister over the Nespresso frother machine. Make sure that you are following all the espresso’s directions.
Step2 – the second step is one of the essential steps to follow up. It is the time when you decide that either you need a hot foam drink or a cold one.
Connect the cord with the electrical switch. If you want the hot product out of it, turn the button on the side of your frother. On turning the button, the red light will blow. Moreover, it will begin the whisk to move.
It starts the heating process, and you will notice an apparent change in your milk. This step of the family will only take around 15-seconds.
You have to whisk the milk almost twice if you use skimmed milk. Because it requires more whisking efforts, this twice-working will provide more efficient results. If you want your coffee to be hot for a long time, it is perfect for adding this hot foam.
You will end up with the perfect taste, quality, and service.
Step3 – The third step is an alternative to the second one. If you need the cold foam from the Nespresso frother, this would be very helpful for your help.
For this, do not turn the button to the side of the frother. Rather than this, it is better to hold the button for a few seconds. At this time, the red light will be replaced by the blue light.
After that, the frother machine will begin its working. It whisks the milk and repeats the process in the same process above. The only change that occurs only falls for the fact that you will receive the cold product as a final output.
You can use this cold brew effectively for ice coffee and other cold brewing drinks.
Also Read: How To Adjust Nespresso Pods Size
Additional Working Instructions
There is a significant difference between hot foam as well as cold foam. You add hot foam to the coffee because it enhances the taste and provides much effectual output.
Your coffee remains hot and warm due to this foam. On the other hand, when it comes to cold foam, it is more integral to maintain the class of the drink you are having!
In the same stance as hot coffee, the cold foam will let you keep your drink cold till the last sip.
All you have to do is follow up on the instructions provided above. Once the instructions have been followed up, you will have a highly professional taste and results.
The hot and cold coffee will let you enjoy the coffee with a more creamy texture. It adds up more flavor to your needs and requirements. You can effectively add up the foam in the shot of espresso as well as the viola.
Apart from all these adding instructions, you must keep the cleaning process in the forefront before taking up anything.
Nespresso Frother Cleaning
The cleaning activity is very much required at the time when you want a continuous, high-quality performance from it. If you do not take care of the cleaning, the milk residue and drops will remain inside it.
It might affect the taste and quality of the foam that you require. For this, it is directed to wash or rinse the frother twice a week to cover up all the old milk issues.
In addition, you might see that sometimes, the milk overheats. It burns inside the frother. The burning impact might be a bit to cover up. It would help if you were very careful while dealing with all these burning impacts.
Any wrong direction will leave you in a difficult situation and might affect the operational performance of the Nespresso frother. For further cleaning details, it is better to look for professional guidelines.
A single professional care guide will help you gain several new techniques to achieve a perfect outcome.
Also Read: How to Fix Nespresso Red and Yellow Light
Frequently Asked Questions
1: How to clean Nespresso milk frother?
The cleaning activity for the Nespresso frother is straightforward. You should use warm water for the cleaning activity and scrub the internal lining of the frother with the help of a non-abrasive cloth so that it does not impart any scratch and fluctuations to your frother. After the rinsing activity, it is directed to clean it thoroughly and dries up all the moisture.
2: What are the advantages of the Nespresso Frother?
An excellent variety of frothers is available, but espresso has a more popular space. It ensures a quick working performance to the foaming. You can add this foaming to the hot and cold drink per your taste and requirement. It is easy to operate and provides high-edge assurance for your needs.
The Final Statement
As stated above, working and using the foam frothing is not challenging to operate. You know about the working details. In the context provided above, we tried to present a comprehensive guide to you.
The Nespresso frother machine is the best choice if you are an espresso lover.
We try to cover; How to Use Nespresso Frother? in a very comprehensive way; thus, we hope that you would find it worthy per your personal experience and needs.
Related Articles:
![Cuisinart Coffee Maker Troubleshooting [Most Common Problems & Solution]](https://coffeenatic.com/wp-content/uploads/2022/07/cuisinart-coffee-maker-troubleshooting-768x440.jpg)